User stories often are deliberately vague at first. If work won’t begin on a story for a couple of iterations, agile teams have learned there is little value in adding detail to the story so far in advance. But the time comes in the life of any user story when adding detail is appropriate. And there are two ways a team can add detail to a user story: split it or add acceptance criteria. Let’s look more closely at both methods.
Approach 1: Split the Story
The first approach to adding detail is to split the story into multiple sub-stories. When you create multiple, smaller stories, you’ll have more detail, simply as a side effect of having written more. As an example, suppose you would like to allow people to log into a new product using their social media accounts. You may start by writing a story indicating nothing more than that:
- As a user, I can log in through a social media account.
If the team won’t implement that story for a few iterations, this story is likely quite sufficient as is. However, as the time when the team will work this story approaches, additional detail is needed. Minimally, the team will want to know what social media accounts can be used for logging into the new product. That may lead to replacing the initial story with sub-stories like:
- As a user, I can log in through my Facebook account.
- As a user, I can log in through my LinkedIn account.
- As a user, I can log in through my Twitter account.
By writing these sub-stories, the product owner has provided the team with the additional detail of which social media accounts need to be supported.
Approach 2: Add Acceptance Criteria
A second way of adding detail to a story is to add notes about what the story must do in order for the product owner to accept it as complete. For now, we can refer to these as the acceptance criteria for the story.
When working with physical index cards, acceptance criteria are most commonly added to the back of a story card. Any decent software tool for managing a product backlog will have a place for adding the acceptance criteria, even if merely as notes attached to a story.
For the case of logging in through social media, we would have the following story and acceptance criteria:
- As a user, I can log in through a social media account.
- Acceptance criteria:
- Can log in through Facebook
- Can log in through LinkedIn
- Can log in through Twitter
- Acceptance criteria:
From these two examples, you can see how either creating sub-stories or adding acceptance criteria results in more detail being provided.
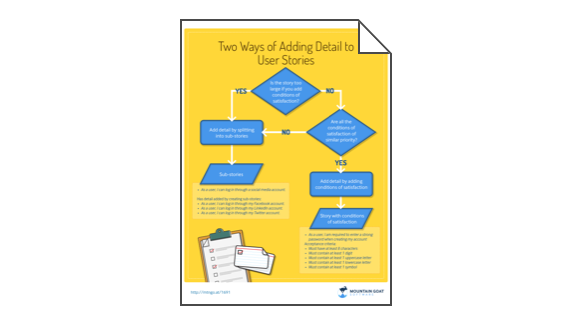
And so, either approach can work for adding detail as a story moves toward the top of the product backlog and the time when it will be worked on. But, the two approaches do offer unique advantages, so let’s see how you can decide which approach is best in different circumstances.
Choosing Between the Approaches
So, how do you choose between adding detail by breaking the initial story into sub-stories rather than adding acceptance criteria?
There are two reasons to opt for creating sub-stories. The first is if the initial story is too large to fit easily within an iteration, especially once its acceptance criteria are added.
When a story is large, it needs to be split so that the team can complete some subset of it within an iteration. If a story needs to be split anyway, don’t bother adding acceptance criteria to it, just split the story.
This is likely what the team would do in our example of the log in through social media story. If supporting logging in through Facebook, LinkedIn, and Twitter made the story too big to fit easily into a single iteration, the team would want to split it along those boundaries.
Differing Priorities: A Second Reason to Write Sub-Stories
A second reason to split a story into sub-stories rather than adding acceptance criteria is when the acceptance criteria would be prioritized differently by the product owner.
In the case of logging in through social media, suppose the product owner said logging in through LinkedIn was a much higher priority than logging in through Facebook or Twitter. We wouldn’t want one story then that listed all three social networks as acceptance criteria. Instead we’d have one story about logging in through LinkedIn and one or two stories about Facebook and Twitter, depending on whether supporting each of them were of an equivalent priority.
When You Should Add Acceptance Criteria
This means that you add acceptance criteria when the following are both true:
- Adding the acceptance criteria to the story does not make it too big for the team to want to bring it into an iteration, and
- The acceptance criteria are of about the same priority
As an example, consider this story about password strength:
- As a user, I am required to enter a strong password when creating my account.
The requirements for this story are probably things like requiring a password to be 8 or more characters, contain at least one digit, one uppercase letter, one lowercase letter, and one symbol. Breaking each of those needs out as separate stories would lead to overly small stories such as:
- As a user, I am required to enter a password with at least 8 characters.
- As a user, I am required to enter a password with at least 1 digit.
- As a user, I am required to enter a password with at least 1 uppercase letter.
- As a user, I am required to enter a password with at least 1 lowercase letter.
- As a user, I am required to enter a password with at least 1 symbol.
Performing all those checks won’t take a team long to code and test. And we can assume each check is about the same priority. That is, we don’t want to skip the requirement for a digit and come back to it in a month because it would take a long time to implement.
Instead, requiring a strong password would be best as a single story with acceptance criteria added for the specific checks:
- As a user, I am required to enter a strong password when creating my account.
- Acceptance criteria:
- Must have at least 8 characters
- Must contain at least 1 digit
- Must contain at least 1 uppercase letter
- Must contain at least 1 lowercase letter
- Must contain at least 1 symbol
- Acceptance criteria:
You’ll Use Both of These Techniques
A good agile team will use both techniques to add detail to their user stories. They will split a story when the original is large or when its sub-stories will have different priorities. They will take small stories and add detail in the form of acceptance criteria. Neither approach is more valuable than the other, and you want to have each in your toolkit.
A Free PDF to Help You Choose the Approach
I’ve created a PDF you can download that will help you decide which approach is best for any story you’re adding detail to. It also includes examples of the two approaches. It’s entirely free and you can download it below.
Last update: June 25th, 2024

